Sizing a hay barn correctly is one of the most important decisions you can make when planning agricultural storage. A barn that’s too small creates airflow and moisture problems. A barn that’s oversized wastes money and space. The right dimensions strike a balance between storage capacity, ventilation, equipment access, and long‑term flexibility.
This guide breaks down how to size a hay barn properly by focusing on width, wall height, and bay layout, so your barn protects hay quality and works efficiently for years to come.
Why Proper Hay Barn Sizing Matters
Hay is highly sensitive to moisture and heat. Even when stored under cover, poor barn proportions can lead to:
- Condensation dripping onto bales
- Mold growth and nutrient loss
- Restricted airflow between stacks
- Unsafe or inefficient equipment movement
Correct sizing improves air circulation, reduces spoilage, and makes daily handling easier—especially during busy feeding seasons.
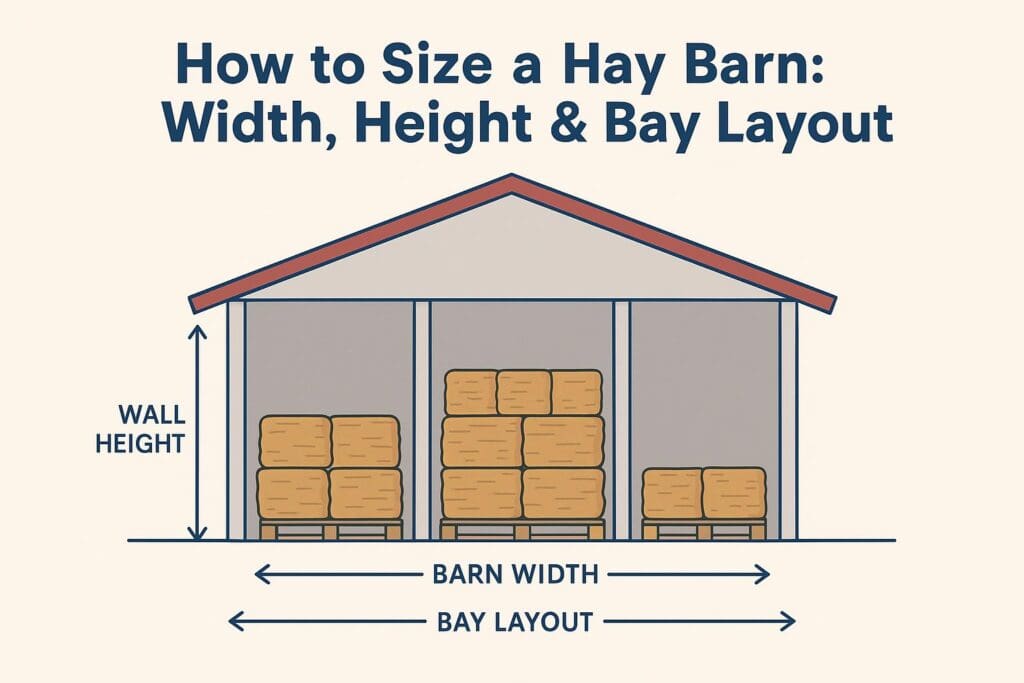
Choosing the Right Hay Barn Width
Why Width Is Critical
Barn width determines how hay is stacked and how air moves through the structure. Narrow barns restrict airflow and limit equipment maneuverability, while wider clear spans allow better ventilation and safer handling.
General Width Guidelines
- 30–40 feet: Small operations, limited equipment, lower bale volumes
- 40–60 feet: Most common size for medium to large operations
- 60+ feet: High‑volume storage or multiple bale rows with wide equipment
Clear‑span post‑frame barns are popular because they eliminate interior posts, allowing tractors and skid steers to move freely while stacking hay efficiently.
✅ Rule of thumb: Choose the widest span your site and budget allow—width improves both airflow and usability.
Determining Proper Wall (Sidewall) Height
Why Height Matters
Wall height controls how high hay can be stacked and how much clearance exists between the top of the stack and the roof. Insufficient height traps heat and moisture near the roofline, increasing condensation risk.
Recommended Wall Heights
- 12–14 feet: Small square bales or low stacking
- 14–16 feet: Large round bales, common stacking heights
- 16–18+ feet: Maximum storage density and airflow clearance
Leave at least 18–24 inches of open space between the top of the hay stack and the roof structure to allow heat and moisture to escape upward.
✅ Taller sidewalls = better ventilation and safer stacking.
Designing an Effective Bay Layout
What Is a Bay?
A bay is the section of the barn between structural posts or frames. Bay layout directly affects how hay is organized and how equipment moves inside the building.
Bay Layout Best Practices
- 12–16 feet per bay works well for most equipment
- Align bays with bale size and stacking pattern
- Design for straight‑through loading and unloading
- Avoid tight corners or dead‑end bays when possible
A well‑planned bay layout:
- Reduces handling time
- Improves airflow between stacks
- Minimizes damage to bales and equipment
For large operations, drive‑through bay designs can significantly improve efficiency during feeding and unloading.
Spacing & Airflow Inside the Barn
Even with the right overall size, internal spacing matters.
Best practices include:
- Leaving 6–12 inches between hay stacks and sidewalls
- Keeping stacks off bare ground using gravel, pallets, or concrete
- Maintaining clear airflow paths from open sides or eaves to the ridge
Air must be able to move around and through the stored hay—not just above it.
Planning for Equipment Access
Always size the barn around your equipment—not just the hay.
Consider:
- Tractor width and turning radius
- Loader height when stacking
- Door width and height
- Drive‑through vs. single‑entry layouts
Oversized doors and wider bays reduce stress, speed up work, and lower the risk of accidents.
Future‑Proofing Your Hay Barn
Hay needs often grow over time. When possible:
- Add extra width rather than length
- Increase wall height slightly beyond current needs
- Design bay layouts that allow expansion
Post‑frame barns are well suited for future additions, making it easier to adapt as your operation changes.
Common Hay Barn Sizing Mistakes to Avoid
- Building too narrow to save cost
- Skimping on wall height
- Ignoring equipment size
- Packing hay too tightly
- Forgetting ventilation clearance
Most of these mistakes are far more expensive to fix later than to design correctly upfront.
Final Thoughts
Sizing a hay barn isn’t just about fitting bales inside—it’s about protecting feed quality, improving airflow, and creating a safe, efficient workspace. By carefully planning width, height, and bay layout, you can build a barn that performs well season after season.
✅ Call to Action
If you’re planning a hay barn and want to size it correctly for your bale type, equipment, and long‑term needs, expert planning makes all the difference.
Call (877) 872‑2276 to discuss hay barn sizing, layout, and design options.